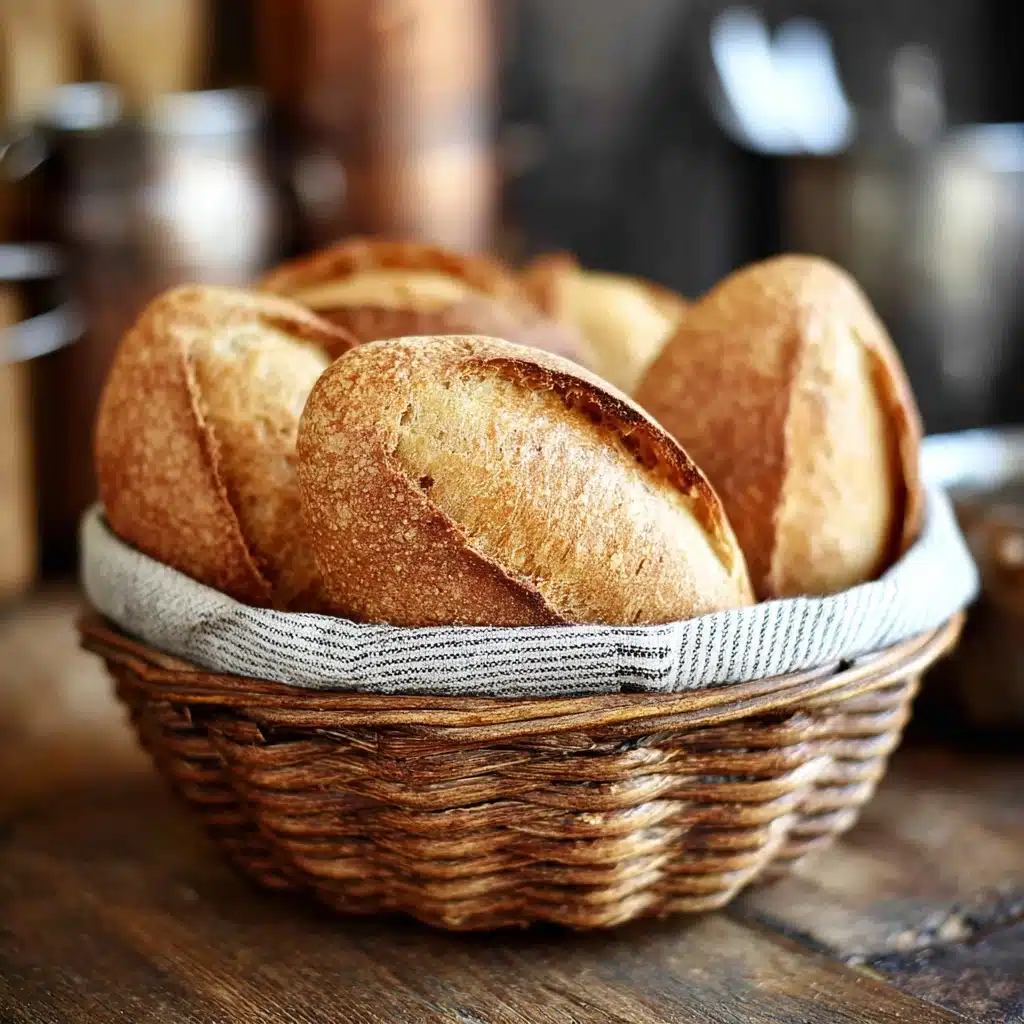
Crusty Chewy French Bread Rolls Artisan Perfection at Home
Let me tell you, if you’re craving bakery-quality bread without leaving your kitchen, Crusty Chewy French Bread Rolls Artisan Perfection at Home will absolutely steal your heart. These rolls deliver a gorgeously crisp crust, delightfully chewy interior, and irresistibly fresh-from-the-oven flavor. Whether you want to sop up a hearty stew, make epic sandwiches, or just tear one apart with a swipe of good butter, this is the ultimate way to bring that artisan breadshop magic into your own wood-and-spoon world.
Ingredients You’ll Need
All it takes to achieve Crusty Chewy French Bread Rolls Artisan Perfection at Home is a simple list of everyday ingredients—each one pulling its weight in taste, texture, and that signature golden color. You’ll be amazed at the magic these staples create together.
- Bread flour: Gives structure and chew, making your rolls pillow-soft inside but with a gorgeous crisp crust.
- Water: Hydrates the dough and activates the yeast for a lofty rise and open crumb.
- Active dry yeast or instant yeast: Brings the lift and airy texture; both types work beautifully.
- Salt: Enhances flavor and strengthens the dough, so every bite has depth.
- Sugar (optional): Helps the yeast feed for a faster rise and gently deepens the flavor.
- Egg wash (optional): Brushed on top, it gives a gorgeous shine worthy of your favorite bakery.
- Additional water (for steam): Creates steam in the oven to get that crisp, crackly crust.
- Herbs or seeds (optional): Sprinkle on top for flavor and visual flair—think sesame, poppy, or rosemary.
How to Make Crusty Chewy French Bread Rolls Artisan Perfection at Home
Step 1: Activate the Yeast
Start by inviting your yeast to the party! Stir warm water with the yeast and just a pinch of sugar in a small bowl. Let it sit for five to ten minutes—the top will turn frothy and fragrant, a sure sign your yeast is alive and ready to puff up your rolls.
Step 2: Combine Dry Ingredients
In a large mixing bowl, combine the bread flour and salt. Mixing these first ensures that the salt won’t directly touch the yeast, which gives your dough its springy structure. Pour in the yeast mixture and gently bring everything together until you have a shaggy dough.
Step 3: Knead the Dough
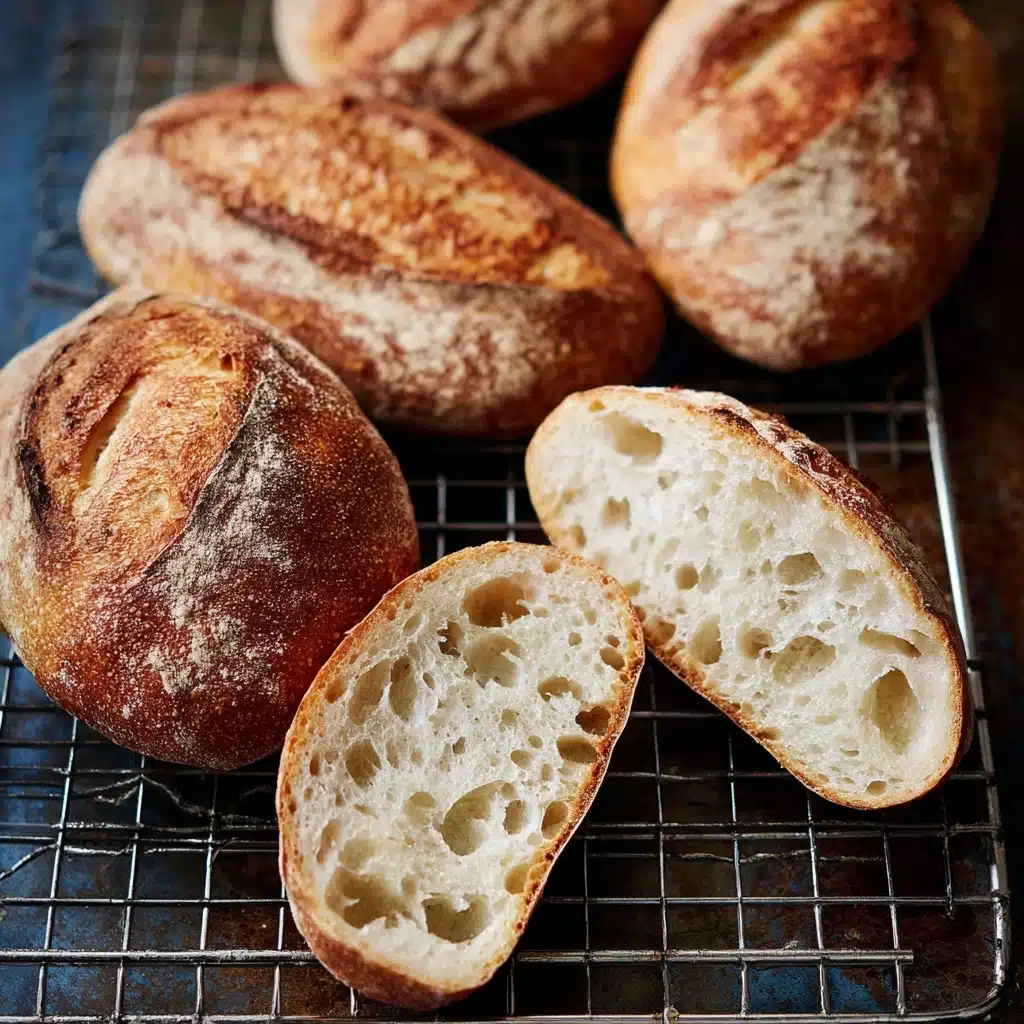
Now for the hands-on magic: knead your dough until it’s silky, elastic, and smooth—about eight to ten minutes by hand or stand mixer. This step develops gluten, which means your finished rolls will have that perfect balance between crusty bite and chewy center.
Step 4: Let the Dough Rise
Cover the bowl with a damp towel and let the dough rise in a cozy, draft-free spot for about one and a half to two hours. When it’s doubled in size, you know it’s ready—puffy and full of those wonderful baking aromas.
Step 5: Shape the Rolls
Turn the dough onto a floured surface and punch it down gently. Split it into equal-sized portions—anywhere between eight and twelve, depending on how hefty you like your rolls. For that professional shape, tuck and fold each piece into a tight ball, sealing the edges underneath.
Step 6: Second Rise
Arrange your dough balls on a parchment-lined baking sheet, leaving some space for spreading. Cover them loosely with plastic wrap or a clean towel, and let them puff up again for thirty to forty-five minutes. This quick rest will give your h Bread Rolls Artisan Perfection at Home their final lift.
Step 7: Score and Glaze
Just before baking, use a sharp knife (or a baker’s lame if you’re feeling fancy) to score the tops of your rolls. This allows them to expand in the oven for a dramatic, artisan look. Brush with egg wash for shine or mist with water for an extra-crusty result.
Step 8: Bake with Steam
Preheat your oven to a roaring 425°F (220°C). For that authentic bakery crust, add a pan of hot water to the bottom rack to create steam. Bake your rolls for fifteen to twenty minutes, until the tops are deeply golden and your kitchen smells positively heavenly.
Step 9: Cool and Enjoy
Lift your golden h Bread Rolls Artisan Perfection at Home onto a wire rack and let them cool just enough to handle. The crust will crackle, the crumb will be tender—you did it! Serve them warm for maximum joy.
How to Serve Crusty Chewy French Bread Rolls Artisan Perfection at Home
Garnishes
Dress up your bread with a sprinkling of coarse salt, poppy or sesame seeds, or a dusting of chopped fresh rosemary over the glossy tops for a bakery-fresh look and extra pop of flavor. If you made an egg wash, this is the moment to let those toppings shine!
Side Dishes
Few things make a meal feel more complete than tearing into fresh rolls alongside a big bowl of soup or salad. French onion soup, creamy tomato bisque, or a vibrant spring greens salad all happily invite h Bread Rolls Artisan Perfection at Home to the table. They’re also perfect with hearty stews and pasta dishes—think classic spaghetti or beef bourguignon.
Creative Ways to Present
Go beyond just popping these rolls in a basket. Try slicing them open for slider buns, filling them with earthy cheese and roasted veggies for sandwiches, or hollowing them out to use as adorable soup bowls at your next dinner party. Your guests will rave!
Make Ahead and Storage
Storing Leftovers
Once your h Bread Rolls Artisan Perfection at Home have cooled, store them in an airtight container or zip-top bag at room temperature for up to three days. This keeps them soft and prevents drying out, so you can enjoy bakery flavor all week long.
Freezing
French bread rolls freeze like a dream! Once cooled completely, pop them in a freezer-safe bag and stash them away for up to three months. Thaw at room temperature when the craving strikes—homemade bread on demand is the height of kitchen luxury.
Reheating
To revive day-old or thawed rolls, preheat your oven to 350°F (175°C), wrap the rolls lightly in foil, and warm them for ten minutes. For an extra-crusty finish, sprinkle with a little water before heating. The result: warm, fresh-tasting h Bread Rolls Artisan Perfection at Home every time.
FAQs
Can I use all-purpose flour instead of bread flour?
Yes, you can substitute all-purpose flour if that’s what you have, but the texture may be a little lighter and less chewy than the classic h Bread Rolls Artisan Perfection at Home you get with bread flour.
What’s the purpose of adding steam during baking?
Steam in the oven keeps the outer layer of dough moist, allowing the rolls to fully expand before setting and forming that shatteringly crisp crust that’s signature to artisan breads.
How do I know when my dough has been kneaded enough?
The dough should feel smooth, elastic, and just slightly tacky—if you press it with a finger, it should slowly bounce back. If using a stand mixer, look for the dough to pull away from the sides and almost “clean” the bowl.
Can I make the dough ahead of time?
Absolutely! After the initial rise, you can refrigerate the shaped rolls overnight. Let them come to room temperature and puff up again before baking for fresh h Bread Rolls Artisan Perfection at Home in the morning.
My rolls didn’t brown much on top. Any tips?
Try using an egg wash before baking for more browning, or check that your oven is fully preheated. A high temperature and a well-timed bake are key for deeply golden, crusty rolls.
Final Thoughts
There’s something magical about pulling trays of Crusty Chewy French Bread Rolls Artisan Perfection at Home fresh from your own oven—crispy, golden, and full of life. I hope you treat yourself (and your loved ones) to the joy of homemade bread. Don’t be surprised if these rolls disappear before dinner even hits the table!
PrintCrusty Chewy French Bread Rolls Artisan Perfection at HomeIngredients
Learn how to make artisan-quality Crusty Chewy French Bread Rolls at home with this easy recipe. These rolls are perfect for serving warm with dinner or using for sandwiches.
- Prep Time: 30 minutes
- Cook Time: 20 minutes
- Total Time: 3 hours
- Yield: 12 rolls 1x
- Category: Bread
- Method: Baking
- Cuisine: French
- Diet: Vegetarian
Ingredients
Dough:
- 3 cups bread flour
- 1 cup warm water
- 2 1/4 tsp active dry yeast or instant yeast
- 1 1/2 tsp salt
- 1 tsp sugar (optional)
Additional:
- Egg wash (optional, for shine)
- Additional water (for steam in oven)
- Herbs or seeds (optional, for variation)
Instructions
- Prepare Yeast Mixture: Mix warm water, yeast, and a pinch of sugar in a bowl and let it sit for 5-10 minutes until foamy.
- Mix Dough: In a large mixing bowl, combine flour and salt, then add the yeast mixture.
- Knead Dough: Knead the dough by hand or with a stand mixer for about 8-10 minutes until smooth and elastic.
- Rise: Cover the dough with a damp towel and let it rise for 1.5 to 2 hours until doubled in size.
- Shape Rolls: Punch down the dough, divide into portions, shape into balls, and place on a baking sheet.
- Second Rise: Let the rolls rise for another 30-45 minutes.
- Preheat Oven: Preheat to 425°F (220°C) with a pan of water for steam.
- Score and Bake: Score the rolls, brush with egg wash or water, and bake for 15-20 minutes.
- Cool and Serve: Let the rolls cool slightly on a wire rack before serving warm or at room temperature.
- Store: Store leftovers in an airtight container or freeze for later use.
Notes
- You can customize the rolls by adding herbs or seeds to the dough.
- For a shinier crust, use an egg wash; for a crunchier crust, spray with water before baking.
- These rolls are versatile and can be served with various meals or as a snack.
Nutrition
- Serving Size: 1 roll
- Calories: 150
- Sugar: 1g
- Sodium: 200mg
- Fat: 1g
- Saturated Fat: 0g
- Unsaturated Fat: 1g
- Trans Fat: 0g
- Carbohydrates: 30g
- Fiber: 1g
- Protein: 5g
- Cholesterol: 0mg
Keywords: French Bread, Rolls, Artisan, Homemade, Crusty, Chewy